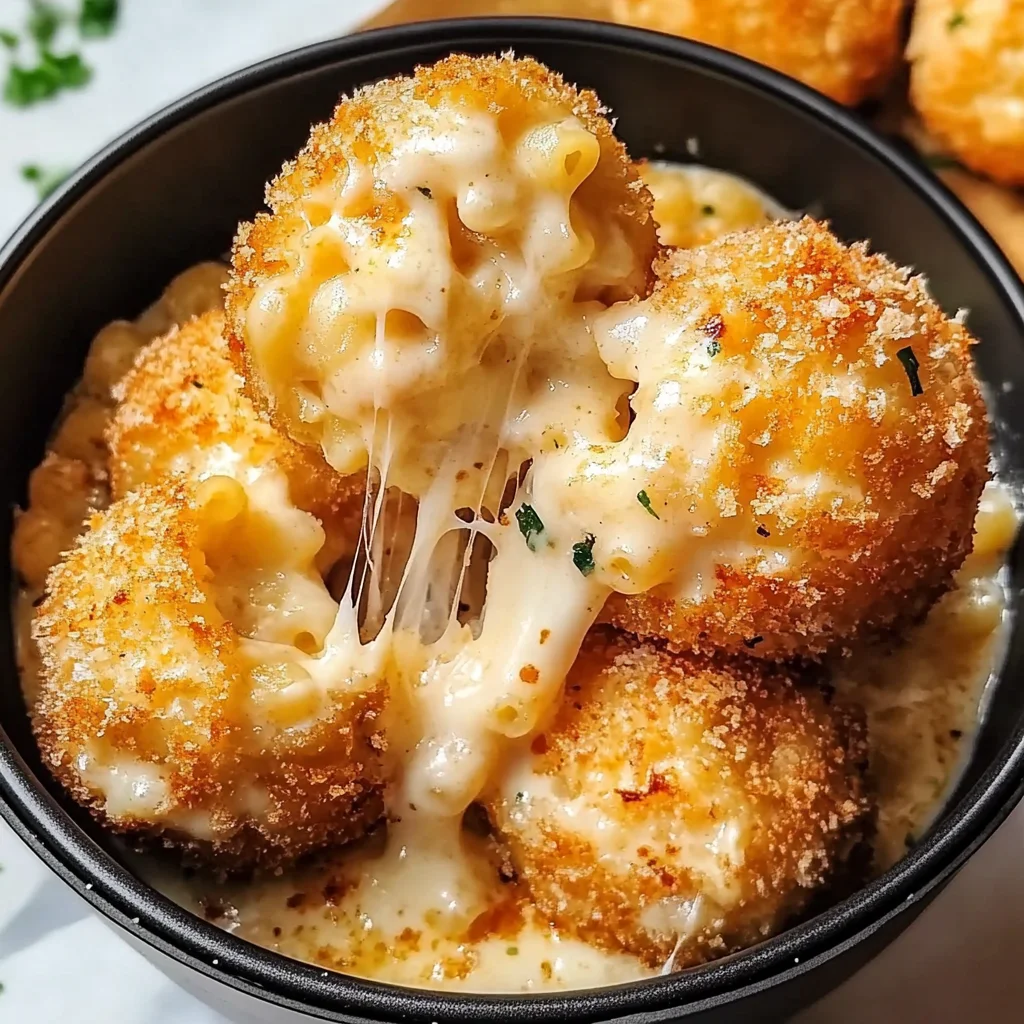
Cheesecake Factory Air Fryer Fried Macaroni and Cheese Balls
If you’re looking for a dish that combines comfort with a touch of fun, then these Cheesecake Factory Air Fryer Fried Macaroni and Cheese Balls are just the ticket! They bring back fond memories of cozy family gatherings and movie nights. With their crispy exterior and creamy, cheesy center, they are sure to be a hit at any occasion—be it a busy weeknight dinner or a festive get-together with friends.
What makes this recipe extra special is how easy it is to prepare. You can whip up a batch in no time, and the best part? They’re made in the air fryer, which means less mess and fewer calories without sacrificing flavor. Trust me, once you try them, you’ll want to make these cheesy delights again and again!
Why You’ll Love This Recipe
- Quick to Prepare: This recipe takes just 45 minutes from start to finish, making it perfect for any night of the week.
- Family-Friendly: Kids and adults alike will love the cheesy goodness packed into each bite!
- Make-Ahead Friendly: Prepare the macaroni balls in advance and freeze them for an easy snack later on.
- Healthier Option: The air fryer gives you that delightful crunch without all the oil used in traditional frying.
- Customizable: Feel free to get creative with different cheeses or add-ins for a personalized twist!
Ingredients You’ll Need
Creating these delicious Air Fryer Fried Macaroni and Cheese Balls is simple with just a few wholesome ingredients. Here’s what you’ll need:
For the Pasta
- 1 cup elbow macaroni
For the Cheese Sauce
- 2 tablespoons butter
- 2 tablespoons all-purpose flour
- 1 1/4 cups milk
- 1/2 teaspoon garlic powder
- 1/2 teaspoon onion powder
- 1/2 teaspoon salt
- 1/4 teaspoon black pepper
- 1 1/2 cups shredded mozzarella cheese
- 1/2 cup grated Parmesan cheese
For Breading
- 1 large egg
- 1/2 cup bread crumbs
- 1/2 cup panko bread crumbs
- 1/4 cup all-purpose flour
For Cooking
- Vegetable oil for spraying
Variations
This recipe is so versatile! Feel free to mix things up based on your preferences or what you have on hand. Here are some fun ideas:
- Add Some Spice: Mix in some diced jalapeños or crushed red pepper flakes for a spicy kick.
- Cheese Swap: Try using different cheeses like cheddar or gouda for unique flavors.
- Veggie Boost: Incorporate finely chopped spinach or broccoli into the cheese mixture for added nutrition.
- Gluten-Free Option: Substitute regular breadcrumbs with gluten-free options to make this suitable for gluten-sensitive diets.
How to Make Cheesecake Factory Air Fryer Fried Macaroni and Cheese Balls
Step 1: Cook the Pasta
Begin by cooking your elbow macaroni according to package instructions. Drain it well and set it aside. This step ensures your pasta is perfectly tender, ready to soak up all that cheesy goodness!
Step 2: Make the Cheese Sauce
In a medium saucepan, melt the butter over medium heat. Once melted, whisk in the all-purpose flour continuously for about 1-2 minutes until it forms a roux. This is key because it gives your cheese sauce that rich texture we all crave!
Step 3: Add Milk and Seasonings
Slowly pour in the milk while whisking vigorously to avoid lumps. Stir in garlic powder, onion powder, salt, and black pepper until smooth. Allow this mixture to simmer for about 3-4 minutes until it thickens slightly; this is where all those wonderful flavors come together!
Step 4: Incorporate the Cheeses
Remove your saucepan from heat and stir in both shredded mozzarella and grated Parmesan cheeses until fully melted. This creates a creamy cheese sauce that coats your pasta beautifully.
Step 5: Combine Pasta with Cheese Sauce
Now it’s time to mix! Add your cooked elbow macaroni into the cheese sauce, stirring until every piece of pasta is coated evenly. This step is crucial—it’s what makes every bite taste like pure comfort food.
Step 6: Cool the Mixture
Let your macaroni-and-cheese mixture cool down for about 15-20 minutes. Cooling helps it firm up so that you can easily shape them into balls without falling apart.
Step 7: Forming the Balls
Once cooled, scoop small portions of that gooey goodness and shape them into balls using your hands. Don’t worry if they aren’t perfect; each one will still be delicious!
Step 8: Bread Your Balls
Set up an assembly line with beaten egg in one dish and a mix of bread crumbs and panko in another. Dip each ball first in egg then roll it in breadcrumbs until fully coated—this gives them that irresistible crunch when cooked.
Step 9: Spray & Preheat Air Fryer
Place your breaded mac-and-cheese balls back onto a parchment-lined baking sheet. Give each ball a light spray of vegetable oil—this helps them crisp up nicely during air frying!
Step 10: Air Fry Them Up!
Preheat your air fryer to 375°F (190°C). Arrange your macaroni balls in a single layer inside the basket ensuring they don’t touch each other. Cook them for about 8-10 minutes, flipping halfway through until they’re golden brown.
Step 11: Enjoy!
Carefully remove your crispy mac-and-cheese balls from the air fryer and let them cool slightly before serving! Pair them with your favorite dipping sauce—trust me; they will disappear fast!
Pro Tips for Making Cheesecake Factory Air Fryer Fried Macaroni and Cheese Balls
These delicious bites are sure to impress, and a few simple tips can take them from good to unforgettable!
-
Use cold macaroni mixture: Allowing the macaroni and cheese mixture to cool before forming balls helps them hold their shape during frying. This prevents them from falling apart and ensures a perfect crispy exterior.
-
Be generous with breadcrumbs: Coating the macaroni balls with plenty of bread crumbs and panko creates an extra crunchy texture. The combination of regular bread crumbs and panko adds depth, making each bite even more satisfying.
-
Don’t overcrowd the air fryer: Cooking the macaroni balls in batches allows for even cooking and crispiness. If too many balls are placed in the air fryer at once, they may steam rather than fry, resulting in a less desirable texture.
-
Experiment with spices: Feel free to customize the seasoning in your cheese sauce or breadcrumb coating. Adding Italian herbs or a pinch of cayenne pepper can elevate the flavor profile and give your mac and cheese balls a unique twist.
-
Serve immediately: These balls are best enjoyed right out of the air fryer while they’re hot and crispy. If you need to prepare them ahead of time, keep them warm in a low oven until ready to serve.
How to Serve Cheesecake Factory Air Fryer Fried Macaroni and Cheese Balls
Presentation can make all the difference when serving these delightful treats! Here are some fun ways to present your fried macaroni and cheese balls that will wow your guests.
Garnishes
- Fresh herbs: Chopped parsley or chives add a pop of color and freshness that complements the rich flavors of the mac and cheese.
- Grated cheese: A sprinkle of additional grated Parmesan or cheddar on top offers a cheesy finish that enhances the dish visually and flavor-wise.
- Microgreens: These tiny greens not only look elegant but also provide a slight crunch that balances the creamy texture.
Side Dishes
- Garden salad: A light garden salad with mixed greens, tomatoes, cucumbers, and a vinaigrette dressing provides a refreshing contrast to the rich flavor of the mac and cheese balls.
- Roasted vegetables: Seasonal roasted vegetables like zucchini, bell peppers, or asparagus make for a colorful side that’s full of nutrients. Their natural sweetness pairs well with cheesy snacks.
- Dipping sauces: Serve your mac and cheese balls with variety! Marinara sauce adds tangy zest, while ranch dressing offers creamy goodness. A spicy aioli can kick things up a notch!
- Fruit platter: A vibrant fruit platter with seasonal fruits like strawberries, grapes, or melon slices creates a sweet balance to the savory flavors of your fried mac and cheese balls.
With these tips in mind, you’ll be well-equipped to create an unforgettable experience around your Cheesecake Factory Air Fryer Fried Macaroni and Cheese Balls! Enjoy every crispy bite!

Make Ahead and Storage
These Cheesecake Factory Air Fryer Fried Macaroni and Cheese Balls are perfect for meal prep! They can be made ahead of time, stored, or even frozen for later enjoyment.
Storing Leftovers
- Place any leftover macaroni and cheese balls in an airtight container.
- Store them in the refrigerator for up to 3 days.
- To prevent them from getting soggy, layer parchment paper between the balls.
Freezing
- Allow the macaroni and cheese balls to cool completely before freezing.
- Arrange them in a single layer on a baking sheet and freeze until solid.
- Transfer the frozen balls to a freezer-safe bag or container and label with the date; they can be frozen for up to 2 months.
Reheating
- For best results, reheat in the air fryer at 350°F (175°C) for about 5-7 minutes until heated through and crispy.
- Alternatively, you can reheat them in an oven at 350°F (175°C) for about 10-12 minutes.
- If using a microwave, heat them in short intervals but note that they may lose their crispiness.
FAQs
You might have some questions about making these delicious mac and cheese balls. Here are some common queries:
Can I make Cheesecake Factory Air Fryer Fried Macaroni and Cheese Balls without eggs?
Yes! You can substitute the egg with a flaxseed egg or unsweetened applesauce to help bind the ingredients together.
How long do Cheesecake Factory Air Fryer Fried Macaroni and Cheese Balls last in the fridge?
They will stay fresh in the refrigerator for up to 3 days when stored properly in an airtight container.
Can I use different types of cheese in this recipe?
Absolutely! Feel free to experiment with your favorite cheeses such as cheddar, gouda, or even a spicy pepper jack for extra flavor!
What dipping sauces pair well with these mac and cheese balls?
They go wonderfully with marinara sauce, ranch dressing, or even a zesty buffalo sauce. The choice is yours!
Final Thoughts
I hope you find joy in making these Cheesecake Factory Air Fryer Fried Macaroni and Cheese Balls! They truly embody comfort food heaven with their crispy exterior and creamy interior. Whether you’re preparing them for a cozy family gathering or just treating yourself to something special, I’m sure you’ll love every bite. Enjoy this delightful recipe, share it with loved ones, and let it bring warmth to your table!
Cheesecake Factory Air Fryer Fried Macaroni and Cheese Balls

If you’re craving a delightful snack that marries comfort with a hint of fun, Cheesecake Factory Air Fryer Fried Macaroni and Cheese Balls are your answer! With a crispy outer layer and a creamy, cheesy center, these delectable bites are perfect for any occasion. Whether it’s a weeknight dinner or a lively gathering with friends, they promise to be a hit. Plus, being made in the air fryer means less mess and fewer calories without compromising on flavor. Easy to whip up and endlessly customizable, you’ll find yourself reaching for these comforting treats time and again.
- Prep Time: 15 minutes
- Cook Time: 10 minutes
- Total Time: 25 minutes
- Yield: Approximately 6 servings (18 balls) 1x
- Category: Appetizer
- Method: Frying
- Cuisine: American
Ingredients
- 1 cup elbow macaroni
- 2 tablespoons butter
- 2 tablespoons all-purpose flour
- 1 1/4 cups milk
- 1/2 teaspoon garlic powder
- 1/2 teaspoon onion powder
- 1/2 teaspoon salt
- 1/4 teaspoon black pepper
- 1 1/2 cups shredded mozzarella cheese
- 1/2 cup grated Parmesan cheese
- 1 large egg
- 1/2 cup bread crumbs
- 1/2 cup panko bread crumbs
- Vegetable oil for spraying
Instructions
- Cook elbow macaroni according to package instructions; drain and set aside.
- In a saucepan, melt butter over medium heat, then whisk in flour to create a roux.
- Gradually pour in milk while whisking; add seasonings and simmer until thickened.
- Stir in mozzarella and Parmesan until melted; combine with macaroni.
- Cool mixture for about 15 minutes, then form into balls.
- Coat balls in beaten egg, then roll in breadcrumbs.
- Spray with vegetable oil and air fry at 375°F (190°C) for about 8-10 minutes.
Nutrition
- Serving Size: 3 balls (90g)
- Calories: 260
- Sugar: 3g
- Sodium: 480mg
- Fat: 12g
- Saturated Fat: 6g
- Unsaturated Fat: 5g
- Trans Fat: 0g
- Carbohydrates: 30g
- Fiber: 2g
- Protein: 10g
- Cholesterol: 70mg